mini great cabin
May. 9th, 2009 09:17 pmStructurally, the miniature great cabin is finished! Only structurally, mind. It is also furnished and somewhat adorned and fully electrified, but I'm sure it will always be a work in progress. It will never be officially FINISHED, of course. And while I'm still working on the sick bay below, I'll have to keep unplugging it and taking all the furniture and accessories out so I can move it around, so I haven't even really had a chance to lay out all the little things - sextant, books, bicorn, sheet music, maps... I did do a mini photo shoot though, with some of the things in place. So take a peek!

Last time I updated, I had just finished making the little cabinets and glazing the windows. So here are the cabinets in situ, the last time I had the back of the cabin open. It took a lot of guts to finally glue the window and stern locker into place. Now I'll never be able to reach into the back of the cabin again. *sniff*

And here is the cabin in its completeness. All the molding and structural details in place.


The cabinets are comfortably nestled in their space.

And here it is furnished.
A peek through the windows from the back. That's the decanter that![[livejournal.com profile]](https://www.dreamwidth.org/img/external/lj-userinfo.gif) alto2 gave me!
alto2 gave me!

And here it is with the lights on (and a peek at the sick bay with lights too.)

That lovely decanter again, plus my flintlock pistol. And behind is the Sophia candelabra, which I forgot to mention. I wired it for candles, and oh my goodness, it nearly drove me insane.

You see, this is what it looked like before:

And I thought, "Oh, I'll just stick some candles in it, and wire it up, and it will be great! Right?" Wrong! Argh, if you want an electrified candelabra, fellow miniaturists, please, save yourself and just buy an electrified candelabra! Not many things in miniatures drive me insane, but this was one of them. (I think the other is installing hinges.)
It looks pretty nice from the front, right?

Here's the back where all the wires are hiding. (HIDING WIRES! Not easy! Also, see how the candles are kind of hovering above the cups instead of sitting in them? That's because the wires only come out of the BOTTOM of the candles. They should make alternative candles where the wires come out of the side, just a little above the base, so if someone wants to stick candles in an existing candlestick it won't be so hard. They should also make shiny wires.
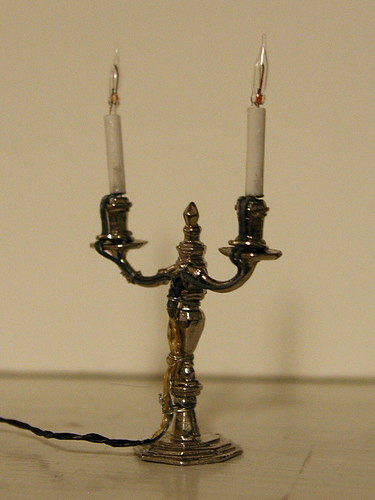
I wrapped silver wire around the candelabra to hold the electrical wires in place so they wouldn't be floating everywhere. My electrical wires must be contained and subtle. I don't like sticky-outy electrical wires. You can also see that I cut it just short enough to plug in exactly where I wanted, so there wouldn't be excess wire hanging out. Also, since I was using two different bulbs, I had two different sets of wires. But where they meet in the middle of the candelabra, I spliced them together with clear/yellowish heat shrink tubes. Also, I painted the wires to be more subtle - gray on the candelabra, black on the lead, and white at the point where it hangs down in front of the white stern locker and plugs into the wall. But most of that is hidden by the little table anyway, when viewed from most angles.
Wrappy wires:

Never again!!!
By the way, the candles, bulbs, wires, heat shrink tubes, plug, and eyelets all come from Cir-kit Concepts, which really is quite awesome. So does the hanging lamp and the spring-loaded eyelets that hold it up
Edit: Here's a picture to give a sense of scale, for those not familiar with 1:12. Awwww, remember when my baby looked like this?

linked at![[livejournal.com profile]](https://www.dreamwidth.org/img/external/lj-community.gif) little_world and doll_houses . Oh all right, and hms_surprise and perfect_duet and anything_aos and the Gunroom, because lots of comments make me happy.
little_world and doll_houses . Oh all right, and hms_surprise and perfect_duet and anything_aos and the Gunroom, because lots of comments make me happy.
Last time I updated, I had just finished making the little cabinets and glazing the windows. So here are the cabinets in situ, the last time I had the back of the cabin open. It took a lot of guts to finally glue the window and stern locker into place. Now I'll never be able to reach into the back of the cabin again. *sniff*
And here is the cabin in its completeness. All the molding and structural details in place.
The cabinets are comfortably nestled in their space.
And here it is furnished.
A peek through the windows from the back. That's the decanter that
And here it is with the lights on (and a peek at the sick bay with lights too.)
That lovely decanter again, plus my flintlock pistol. And behind is the Sophia candelabra, which I forgot to mention. I wired it for candles, and oh my goodness, it nearly drove me insane.
You see, this is what it looked like before:
And I thought, "Oh, I'll just stick some candles in it, and wire it up, and it will be great! Right?" Wrong! Argh, if you want an electrified candelabra, fellow miniaturists, please, save yourself and just buy an electrified candelabra! Not many things in miniatures drive me insane, but this was one of them. (I think the other is installing hinges.)
It looks pretty nice from the front, right?
Here's the back where all the wires are hiding. (HIDING WIRES! Not easy! Also, see how the candles are kind of hovering above the cups instead of sitting in them? That's because the wires only come out of the BOTTOM of the candles. They should make alternative candles where the wires come out of the side, just a little above the base, so if someone wants to stick candles in an existing candlestick it won't be so hard. They should also make shiny wires.
I wrapped silver wire around the candelabra to hold the electrical wires in place so they wouldn't be floating everywhere. My electrical wires must be contained and subtle. I don't like sticky-outy electrical wires. You can also see that I cut it just short enough to plug in exactly where I wanted, so there wouldn't be excess wire hanging out. Also, since I was using two different bulbs, I had two different sets of wires. But where they meet in the middle of the candelabra, I spliced them together with clear/yellowish heat shrink tubes. Also, I painted the wires to be more subtle - gray on the candelabra, black on the lead, and white at the point where it hangs down in front of the white stern locker and plugs into the wall. But most of that is hidden by the little table anyway, when viewed from most angles.
Wrappy wires:
Never again!!!
By the way, the candles, bulbs, wires, heat shrink tubes, plug, and eyelets all come from Cir-kit Concepts, which really is quite awesome. So does the hanging lamp and the spring-loaded eyelets that hold it up
Edit: Here's a picture to give a sense of scale, for those not familiar with 1:12. Awwww, remember when my baby looked like this?
linked at
(no subject)
Date: 2009-05-10 03:13 am (UTC)